Model F-96
The GE F-96 was a console radio (41″ x 26.5″ x 14.25″) built in 1937 for the 1938 model year. I haven’t been able to determine it’s original sales price, but most 1930’s console radios ranged from $100 to $250 dollars. At the rate of inflation that would be the equivalent of $1,700-$4,000 dollars depending on the grade and features of the radio in question. I would guess this radio would have cost the buyer about 2K in 2016 dollars.

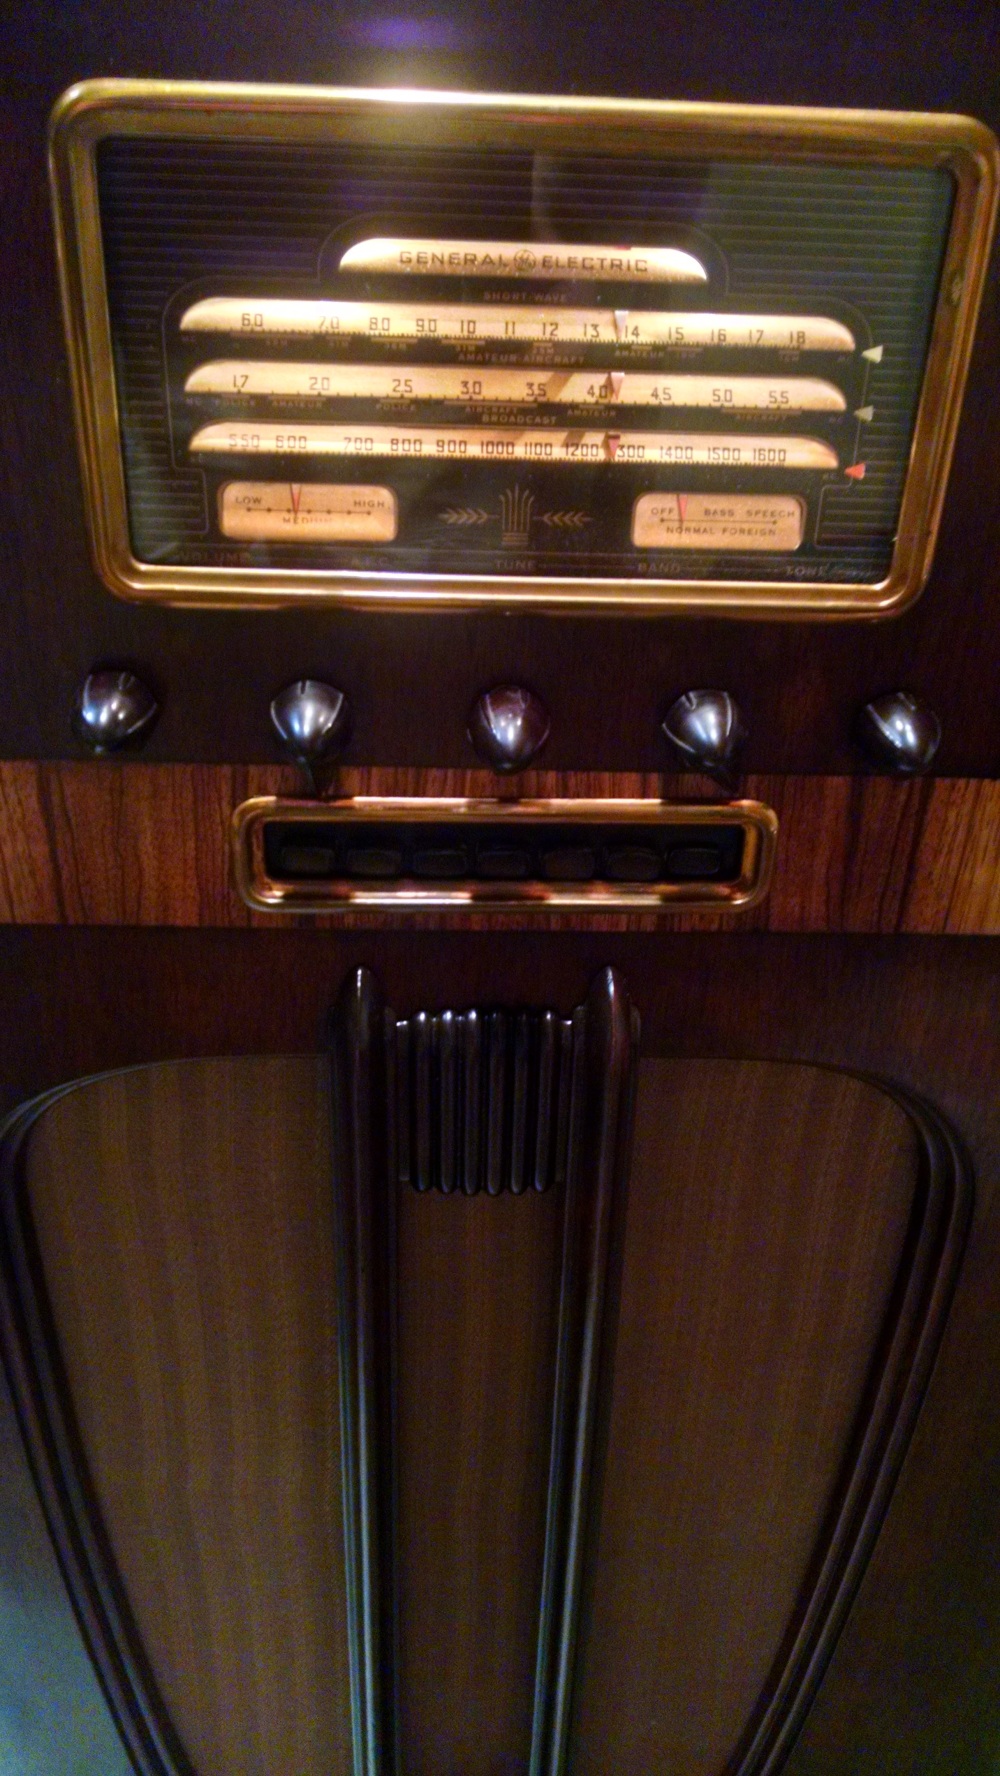
The big marketing feature on this radio was the “Touch Tuning” that allowed the user to push a button and go directly to a favorite station vs having to adjust a tuning dial. The other features listed in the radios users manual were:
- 9 G-E Pre-tested Radio Tubes to insure best performance
- 3 Bands-Range 540-18,000 Kilocycles. Receives standard American broadcasts, aircraft, police, amateurs, foriegn and domestic short-wave stations.
- Touch Tuning. No noise while Touch Tuning from station to station.
- Automatic Frequency Control. Automatically insures perfect tuning.
- Tone Monitor to correct tone distortion and make possible fuller, richer tone.
- 2-stage I.F. System for razor-sharp selectivity and sensitivity.
- Louver Dial, easy to read as a ruler, all scales placed on a straight line.
- Automatic Band Indicator for quick identification of band in operation.
- High-Low Speed Tuning for increased ease and accuracy of tuning.
- Visual Volume Control for ease in obtaining desired volume.
- Visual 4-point Tone Control for choice of Normal, Bass, Speech or Foriegn.
- Automatic Tone Compensation to retain full full tone response at all volumes.
- 12-inch Stabilized Dynamic Speaker for rich and natural tone quality.
- 5 Watts Maximum Power Output.
- Automatic Volume Control to maintain an even volume on all stations.
- Pre-Selector R.F. Stage to eliminate code interference in the standard broadcast band.
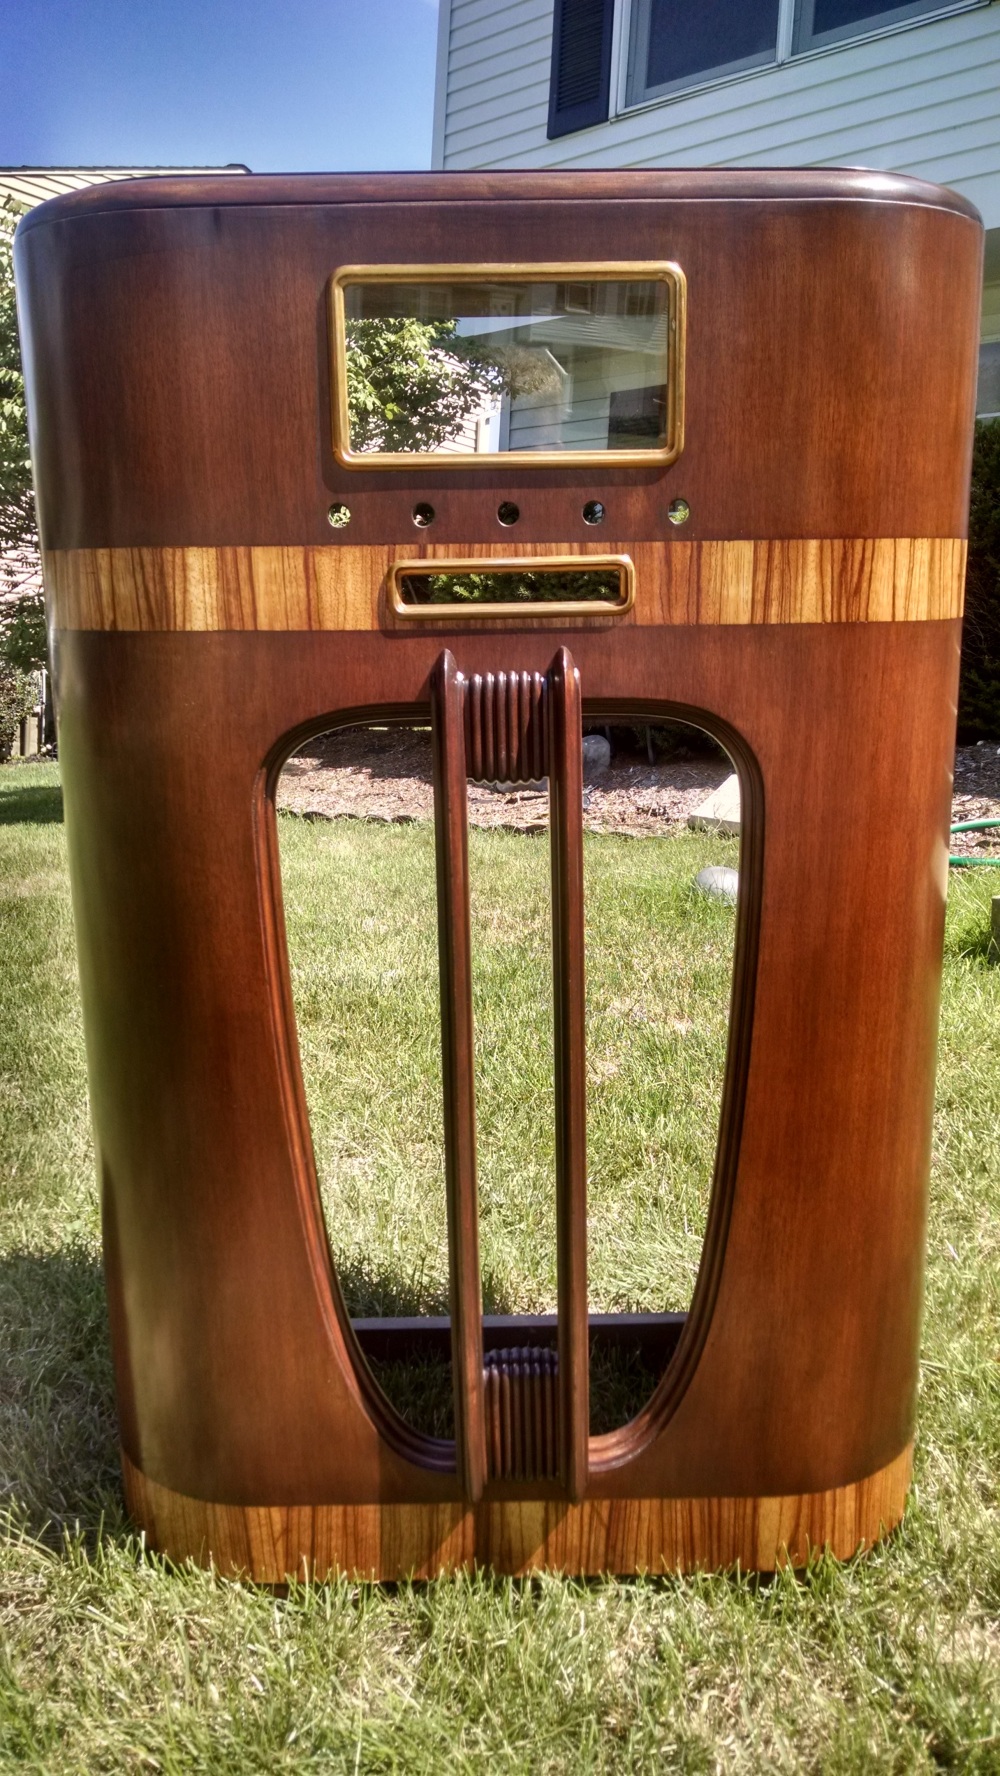
Sweeping a wide curve around both sides, the striped American walnut veneer of this attractive Touch Tuning console strikes a modern note. The inlaid bands of zebrawood add a pleasing touch. Hand rubbing and polishing give the cabinet a satin-like lustre.
The Restoration
When received, the radio was in generally whole condition, with a few cup rings, scuffs and scratches. The biggest flaw was a punched out section of veneer and substrate along the top edge of the cabinet.


The people I was doing this for desired a darker color to match their decor so I began with the usual take down process of removing the chassis, speaker, knobs and fittings and then glued together any loose woodwork and veneer I could.
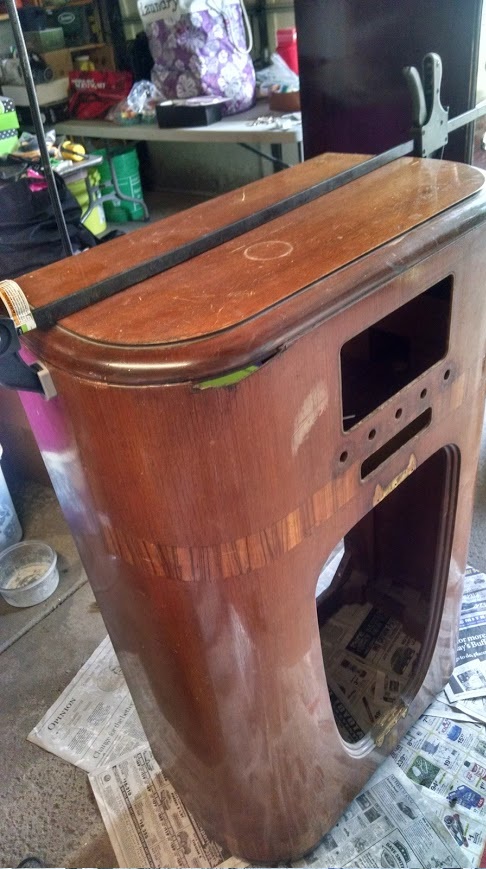
I then stripped off the original finish, sanded, wood filled and wood-grain filled.

This was my first attempt at a veneer patch job. I did my research and followed the typical process. I cut out a clean patch surrounding the damage going diagonally across the grain, made a pencil-rub tracing of the patch and used it to cut out the veneer patch. The patch was then epoxied in place and sanded. I back-filled the damage to the substrate with wood fill. Not “perfect”, but I think it finished out well enough.


Then it was onto the staining and sanding sealer. About 3 coats of sealer with a steel wooling between coats.
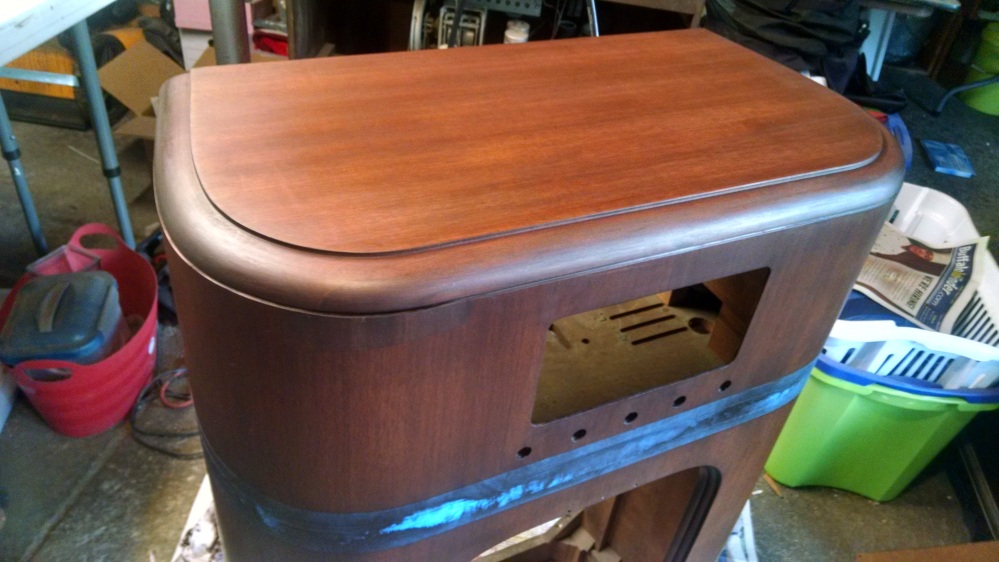
I went against the “purist” rules and topcoated this radio with multiple coats of wipe-on polyurethane. After a week and a day of cure time I gave the case a final rub with wax and 0000 steel wool.
With the case complete it was time to get to the electronic restoration. The chassis on this one was quite large, and the Touch Tuning assembly needed removal to get access to the components beneath it.
PS- The Touch Tuning assembly has a “manual tuning” button that has to be pushed to get ANY station to come in. This means that the assembly has to be wired to the radio or you are not going to hear anything. Don’t ask me how long it took me to figure that one out.
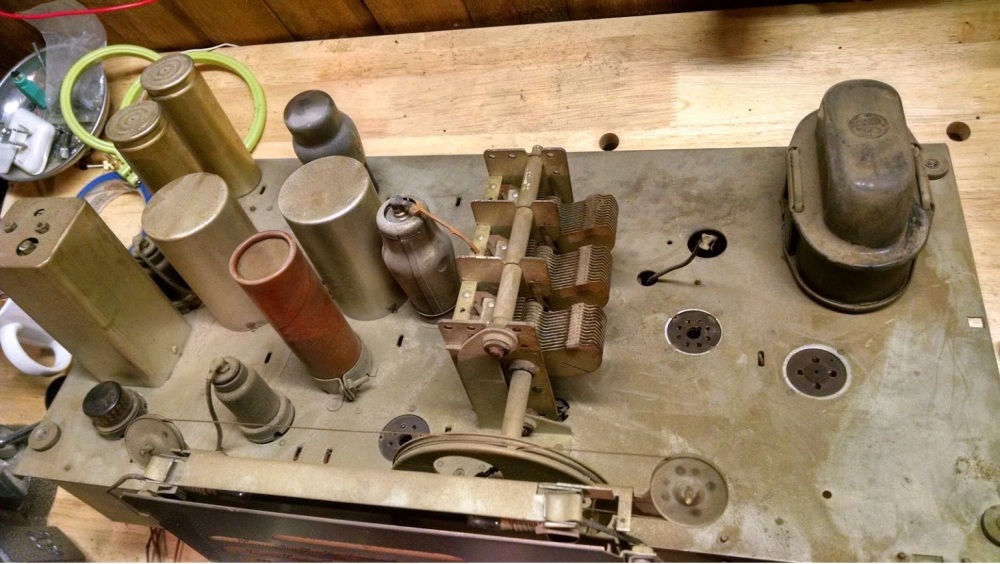

One of the 6K7 tubes had a blown heater filament and the 6H6 was testing Bad so I placed an order for those and got to work.
A general “dust off” and wipedown was followed by a naval jelly cleaning of the top deck of the chassis. The power cord was replaced as was the wiring to the speaker, Safety Line Capacitors were installed and all brittle wire was replaced or sheathed in shrink tube. A “tubes out” dim bulb test of the Power Transformer was done.


From there it was the typical process. The electrolytic capacitors were replaced and the set was warmed up to operating voltages on a Variac. Once it was playing I went through and replaced all capacitors and out of spec resistors.
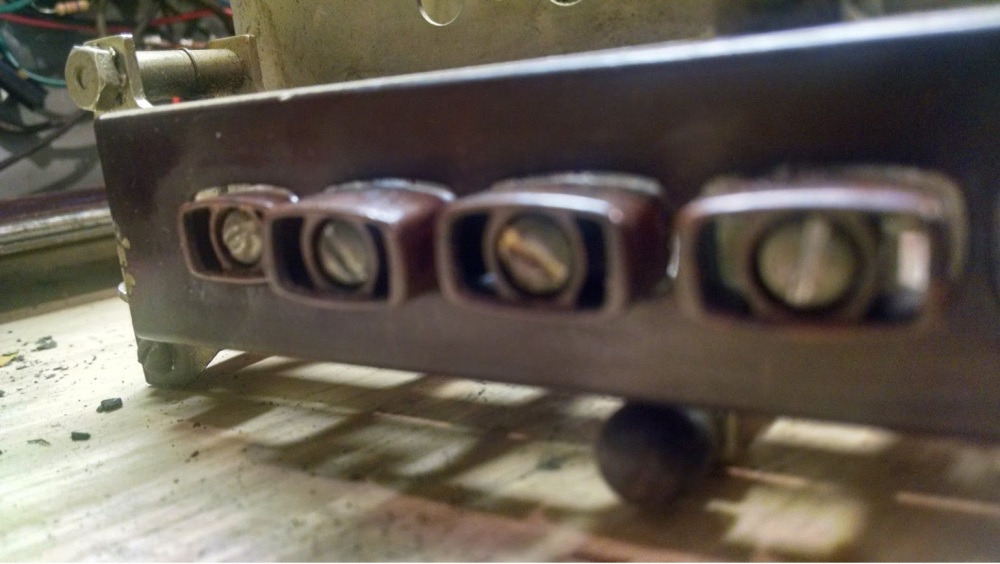
All that was left now was to figure out what to do with the push-buttons on the Touch Tuning assembly. Originally there were small slips of paper with station ID’s placed inside the buttons that were then covered by tiny plastic films. Of course those were all missing, brittle or yellowed. I decided to fill the buttons in with stainable wood filler. The fill was sanded smooth, stained, then coated in Poly. In the event a button needs replacement, the damaged button can be carefully drilled and scraped out.
A new grille cloth was installed and the radio reassembled. Considering this radio requires a long wire antenna and that antenna is in a coil inside the cabinet in this video, it’s still picking up the local AM stations very well.
Hopefully this beautiful piece of American Radio History will give another generation of an American family years of service.